Music Theory. Beginner pianists often balk at these two words, feeling overwhelmed at the sheer amount of material. You don’t have to end up all frustrated and confused. Check out our crash course to music theory for piano beginners! You’ll learn how to sight-read the music, get the rhythm and add chords.
Beginning to tackle music theory can seem like a monumental task. It really isn´t! By learning just a few concepts step-by-step and gradually building up a solid foundation, you can start feeling confident reading music.
For a beginner on the piano, music theory is akin to learning a foreign language. So don´t be too hard on yourself – make mistakes, ask questions, and take risks in order to become a fluent musician. In this guide, we will walk through the essential basics of theory. Get ready – let’s take the first step together!
Start With The Clefs
The first step of beginning to understand music theory is to differentiate between the two most common clefs. When reading piano music, we usually read two clefs simultaneously – treble clef and bass clef, stacked on top of each other as part of a grand staff (shown below).
Treble clef is played with the right hand (abbreviated RH) and bass clef with the left hand (LH). We use treble clef for reading the higher-pitched tones on the right side of the piano, while bass clef is assigned to play the lower-pitched notes on the left side.
Onward To The Note Names!
We read music by assigning letter names of A-G to lines and spaces on the grand staff. Notice that we only have to remember 7 alphabet letters – once we reach G, we begin again with A on the very next white note on the keyboard. Let’s practice this by starting on the lowest A on a piano (which is the bottom note on a standard 88-key piano) and ascending up the white keys of the piano, saying the letter names out loud as we play each note. You can double-check your accuracy below by examining this image of letter names on the keyboard:

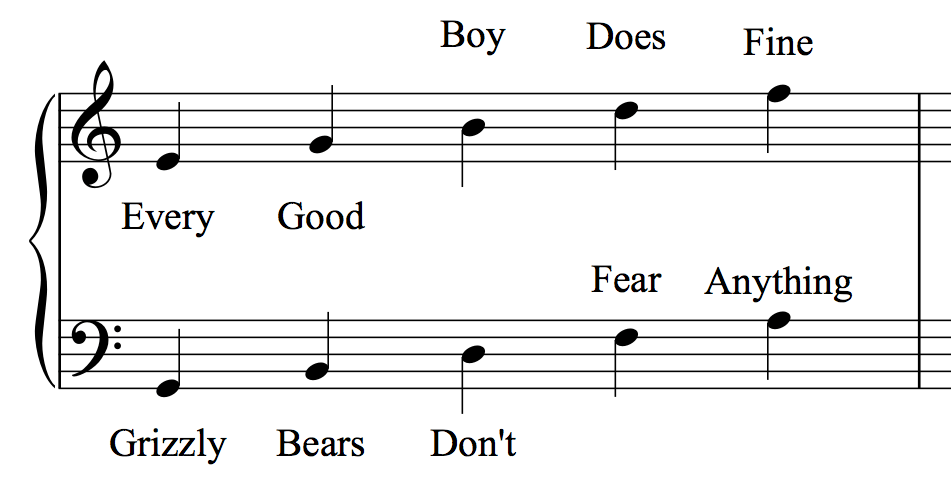
It can be tricky to memorize all the letter names of each line and space on the grand staff, so we can utilize mnemonic devices to assist us. Examine the grand staff below and notice how each letter is assigned a word to form an easy-to-remember phrase. (In the case of the treble clef spaces, the letters form the word FACE.)

It is important to find our guide note, middle C, when locating these notes on the piano. We can think of middle C as being the center of our piano. On a typical 88-key piano, we can start at the lowest C on on the far left side and count up 3 Cs to find our middle C. In general, it is helpful to note that Cs are positioned directly to the left of the set of two black keys.
Practice recognizing the middle C on both the keyboard and grand staff – this will ensure that we have a reference point for finding all the other notes.
Continually drilling our letter names on the grand staff is crucial to developing a reflexive, automatic recognition of notes. Utilizing flash cards can be an exceedingly helpful tool – click here to practice.
What About Notes Written Above And Below The Grand Staff?
So far, we’ve learned how to read the lines and spaces in both treble and bass clef on the grand staff. But what about the notes that are higher and lower than what we can notate on this staff? Using ledger lines solves this problem. Ledger lines simply extend the grand staff and make it easy to read a wider range of notes. In the previous graphic, notice how middle C is not written on the given lines and spaces, but instead is notated on a drawn-in ledger line. Below is a chart demonstrating the extension of the staff by utilizing ledger lines. See if you can identify middle C and determine the position of the ledger line notes on the keyboard.

Essentially, ledger lines create additional lines and spaces on the grand staff in order to notate higher and lower pitches on the keyboard.
Feel That Rhythm
Congratulations, now you know how to read notes on the piano by using the grand staff! Now that we can name and locate our pitches on the keyboard, we can begin to apply rhythm to these notes. Almost all music has a pulse, or beat, that can be notated on a grand staff with note durations (how long the note should be played) and time signature (exactly when it should be played in the grand scheme of things).
In order to notate the duration, we can divide our note values into four core categories:
- Quarter notes
- Half notes
- Whole notes
- Eighth notes
Quarter notes are played for 1 beat, half notes are held for 2 beats, whole notes are held for 4 beats, and eighth notes are played for ½ a beat and therefore are the smallest note value of the 4 categories.
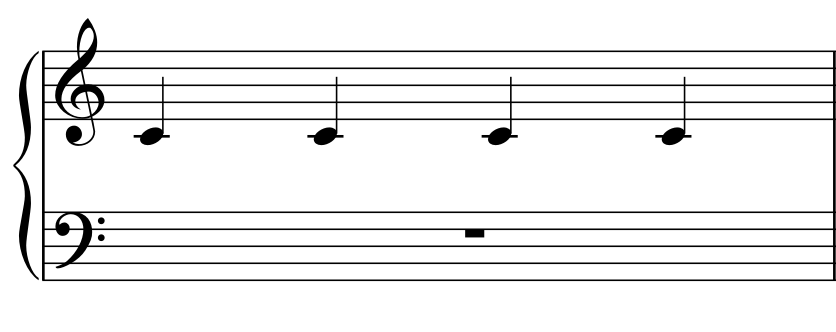
Let´s start by looking at the quarter note. How to recognize a quarter note: its notehead is filled-in (black) and it has a stem. Quarter notes are worth one beat. It can be helpful to steadily clap aloud while saying “quar-ter” for each singular clap. After practicing this, we can move to counting “1” for each clap. Try clapping the example below:
Our next note value is the half note. How to recognize a half note: its notehead is empty (white) with a stem. Half notes are held down for two beats (the length of two quarter notes combined). We can clap and count by saying “half note” for each clap and graduating to “1-2” once we feel comfortable. Be sure to hold your hands together for the entirety of the two beats to demonstrate that each half note is being held down for the appropriate time.

We’re halfway through! Our next note value to learn is the simplest – the whole note. Whole notes do not have stems and are simply notated as an empty oval sitting on the staff. We hold whole notes for 4 beats – the length of two half notes or four quarter notes combined. Try clapping and counting the example below, being sure to count to 4 and holding your hands together after clapping, to properly demonstrate correct timing.
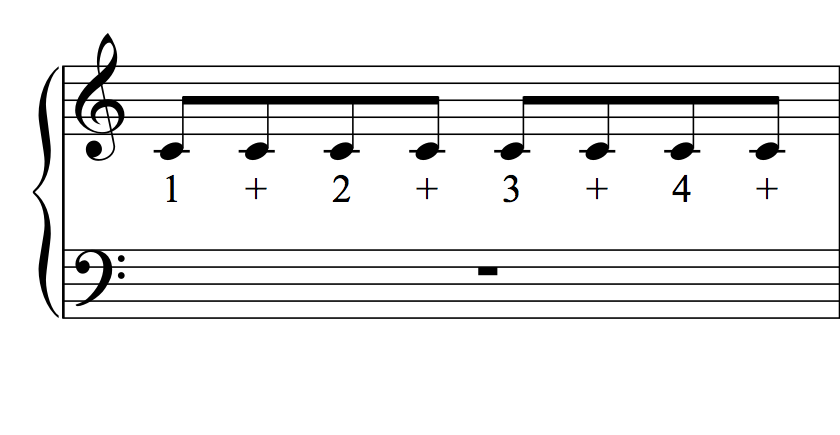
We’ve now just met our longest note value, so let’s now introduce our shortest – the eighth note, easily recognizable as a filled-in notehead with a flag. Eighth notes are played for ½ a beat. To count eighths, we must divide up our typical 1-2-3-4 beats to be able to accommodate our ½ beats. This is simply done by counting “1 and 2 and 3 and 4 and.” We typically clap only the full beats (1-2-3-4) and say the “ands” in between. Remember that eighth notes are faster than quarter notes, so be sure to choose a suitable tempo, or speed, before you begin – don´t go too fast or it might be difficult to clap evenly. Additionally, notice how groups of eighth notes are connected with beams instead of flags.
It’s a good idea to understand how the four core categories of note values subdivide into each other. Having a firm grasp on subdivision is quite useful for developing confidence with counting aloud. Examine this pyramid chart below to see how a whole note can eventually be broken down into 8 eighth notes:

Of course, we can further subdivide eighths into sixteenth notes and beyond, but continue sticking with the four core note values – quarter, half, whole, and eighth notes – until you feel comfortable enough to venture onwards.
Musical Rooms
In all of the previous examples, you may have noticed that we have been dividing up our grand staff into sections using thin lines called barlines. Barlines create measures which help divide the music into small sections with the same number of beats. We can think of measures as being “musical rooms” that aid us in organizing and understanding the beat in a piece of music.
Take a look at an empty grand staff below and notice how the barlines divide the music into measures. Remember, each measure has the same number of beats.
But how do we know exactly how many beats to put into each identical measure?
Learning Our Time Signatures
The stacked numbers directly to the right of the clefs indicate time signature. Time signature tells us how many beats are in each measure (the top number) and what kind of note gets the beat (the bottom number). Let’s look at the most common time signature of 4/4. In the example below, there are 4 beats in each measure and the quarter note gets the beat. First try clapping, then playing on the keyboard.

Other common time signatures include 2/4 and 3/4 where there are 2 beats and 3 beats per measure respectively. Additionally, time signatures exist with bottom numbers other than 4, meaning it is acceptable for note values other than quarters to receive the beat. For now, however, focus on understanding and correctly counting time signatures where the quarter note gets the beat.
Shhhhh – Use Rests
To indicate silence in music, we use rests. Our rest values will coincide with the note values we’ve already learned.

Remembering the difference between whole and half rests can be tricky. A handy method to distinguishing between the two is to be aware of whether the black “box” sits on the top or bottom of the line. Think of the whole rest box as a “hole” in the ground and the half rest box as a “hat” sitting atop the line.
Adding Dots
Now that we know our basic note values, we can begin to discuss dotted notes. A dot adds half the value of the note directly before the dot to the overall value. Here’s a simple equation:
original note value + ½ original value = dotted note
If you’re not a fan of math, this concept may seem frustrating at first, but don’t give up! Examine the chart below and notice how the value changes proportionately once the dot is added:

Let’s look at our good ol’ familiar quarter note as a straightforward example. A quarter note is worth 1 beat. Adding a dot will increase the value of a quarter note by adding half of the quarter note’s value. This means that our equation is:
1 beat (original) + ½ beat (half of original) = 1 ½ beats
Let’s try one more example with a half note. A half note is worth 2 beats. Adding a dot will increase the value of a half note by adding half of the half note’s value. Our equation is:
2 beats (original) + 1 beat (half of original) = 3 beats
This concept takes some practice and memorization, so continue referencing the 4 core dotted note values in the given chart to aid in your understanding of more complex dotted rhythms in the future.
Tie It Out
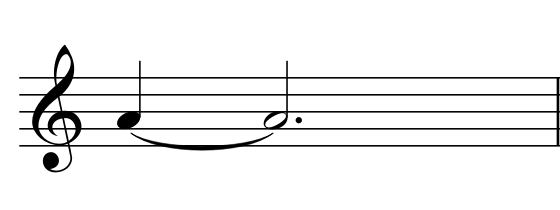
What if we want to hold out a note longer than its value? Ties are very useful for this scenario. A tie is notated as a curved line connecting two notes on the same line or space. Ties indicate that the given note should be held for the combined values of both tied notes. This means that the second note of the tie will not be played, but instead held for the entirety of its note value (along with the value of the previous note).

In the above example, we have a whole note tied to a half note. Remember that a whole note is worth 4 beats and a half note is worth 2 beats. Since a tie indicates we hold down the note for the entirety of both values, we play this E for a total of 6 beats (4 beats + 2 beats=6).
Let’s try one more example:
Here we have a quarter note tied to a dotted half note. A quarter note is worth 1 beat while a dotted half is worth 3 beats. Combining these values together, we learn that our tie indicates we hold the A for 4 beats total (1 beat +3 beats =4).
Half-Steps, Whole-Steps, And An On-Purpose Accident(al)
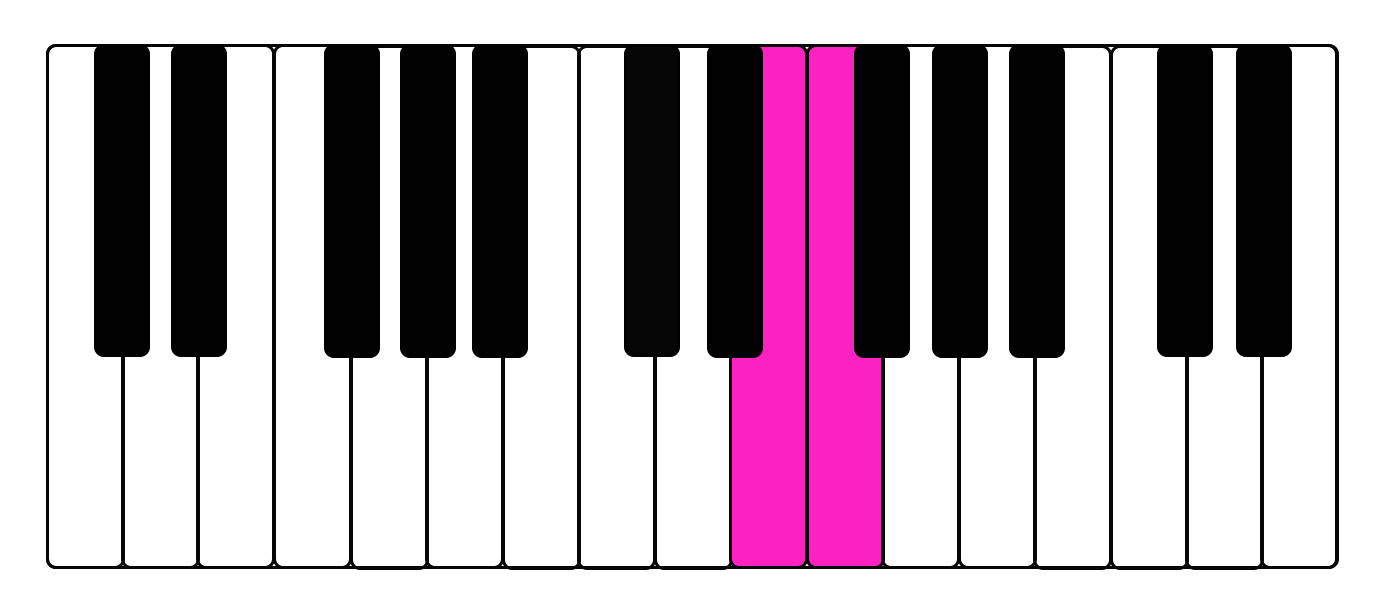
Let’s return to examining the keyboard. In order to properly understand a wide variety of music theory concepts, especially as a piano beginner, we must know the difference between half-steps and whole-steps. Half-steps are simply stepping from one note to the very next note (with no notes in between). Whole-steps are stepping from one note to the next note with one key in between. Below are some examples of half and whole-steps:


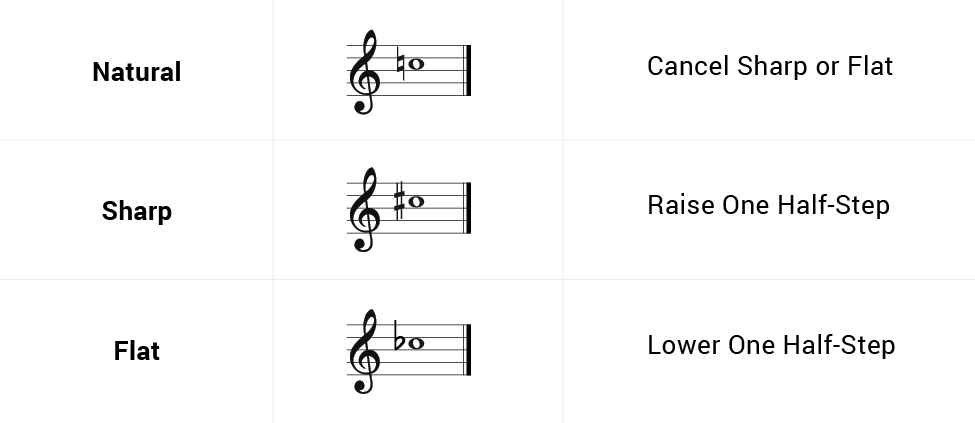
Accidentals build off the concept of whole and half-steps. Writing in an accidental in front of a note indicates an alteration to the original note. Common accidentals include sharps, flats, and naturals. Sharps raise a note by a half-step, while flats lower a note by a half-step. Naturals cancel out any sharps or flats that have previously appeared in the music. When playing sharps or flats, it is common that you will end up on a black key (although not always) – practice by examining this chart and adding accidentals to previous examples.
Chords – All Together Now!
Chords are groups of notes that are played at the same time. The world of chords is vast and expansive – so much so it can be overwhelming. Never fear! We will start with the basics of major, minor, diminished, and augmented chords. Examine the chart below – each chord is a version of a C chord:

- Major chords are built from the root with a major 3rd and minor 3rd on top.
- Minor chords are built from the root with a minor 3rd and major 3rd on top (the reverse of the major chord).
- Diminished chords are built from the root with two minor 3rds stacked.
- Augmented chords are built from the root with two major 3rds stacked.
A major 3rd consists of 4 half-steps and a minor 3rd consists of 3 half-steps.
We can think of the diminished chord as “shrinking” down the minor chord and the augmented chord as “extending” the major chord. We can also think of our root note as our starting note that we build our chord upon – in this example our root is C. To begin developing your ear, practice playing these chord types in a sequence and pay close attention to the difference in the unique emotion of the sound. For example, it is commonly thought that major chords sound bright and happy, while minor chords seem to have a melancholy, dark, and somber sound.
Let’s Add A Seventh!
So far, we have been building chord triads – groups of 3 notes stacked evenly in thirds on top of each other. However, we can add an additional 4th note on top called a seventh. This 4th tone provides additional sonic color and depth to our basic triads. There are a few main types of sevenths.
- A major seventh is a major triad with an added 4th note a half step down from the above root.
- A dominant seventh is a major triad with an added 4th note a whole step down from the above root.
- A minor seventh is a minor triad with a 4th note a whole step down from the above root.
- A diminished seventh is a minor triad with an additional minor third on top.
Remember that in this particular example, C is the root.
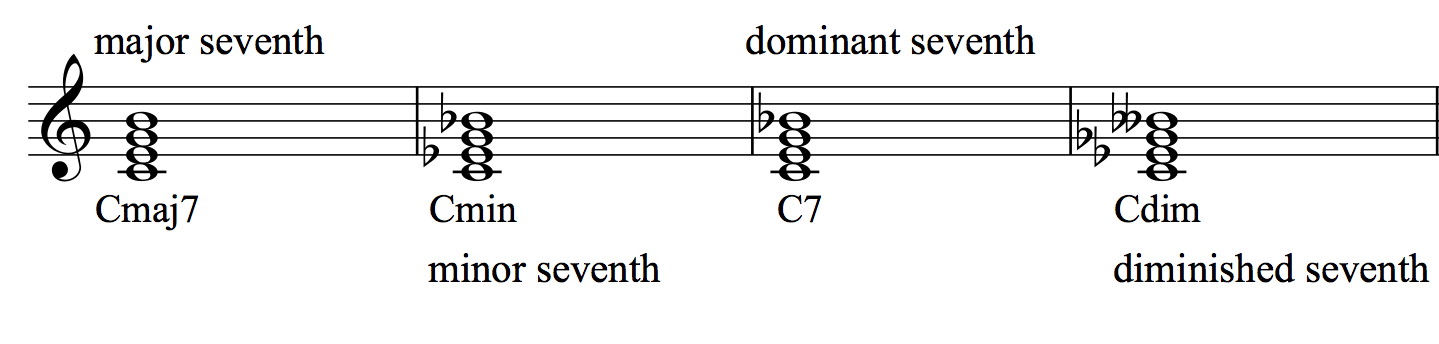
The only chord that is a bit different from what we have previously seen before is our dominant seventh. This chord will become quite important in more advanced stages of music theory, as it is typically the chord that sounds as if it were “pulling” towards resolution (oftentimes ending a piece).
Another Way To Notate Chords
While we often physically write out chords (as in the previous examples), it is also helpful to learn the leadsheet symbols of our major, minor, diminished, and augmented chords. In popular music – such as jazz, pop/rock, and blues – only the melody is notated and chord symbols are placed above the melodic notation.
Below is an example of a typical leadsheet:

The suffix (or abbreviation) after the note letter tells us what quality of chord to play – major, minor, diminished, or augmented. There are many different ways to write leadsheet symbols as you can see from this graph – simply stick to the one that works best for you since all of these examples are universally recognizable.
| Quality | Abbreviations | Examples | Notes for C Root |
|---|---|---|---|
| Major | (none, triad only) Ma, Maj, M, Δ | C CMA7 | C E G C E G B |
| Minor | mi, min, m, – | Cmi C- | C E♭G |
| Diminished | dim, ° | Cdim | C E♭ G♭ |
| Augmented | aug, + | Caug | C E G♯ |
Congratulations – Enjoy Playing!
You’ve successfully aced a crash course in the basics of music theory for piano beginners. Now go out there, get practicing, keep learning and growing, and make some beautiful music using your new knowledge!